SVG (Scalable Vector Graphics) is a very useful tool for drawing shapes and figures with simple code. It is probably one of the most useful tools that web designers are hesitant to use, although once you understand it, you’ll wonder how you lived without it! In this series we’ll be going through the basics of SVG, including how to use it and what it can do for you.

What we will cover in this part
- Basic Structure of SVG
- Tools you can use to make SVG documents more easily
- Basic shapes and drawings with SVG
- Embedding SVG files
- How to use paths
- More advanced structural elements
What kind of language is SVG?
SVG is XML based, which means we use tags similar to the kind we use in HTML. In fact, if you know HTML, SVG should be a breeze. SVG is pretty easy to implement in the core tenants of web design (CSS, HTML and Javascript) and with the rise of an ‘imageless’ web, SVG is going to be a fundamental component to cross device compatibility.
How do we begin?
Starting a new SVG document is really easy! First make a .svg file (for example, file.svg) and open it in your text editor of choice. Like any XML based document, we will begin with some semantics. That just means we have a few lines telling the browser exactly what we are creating. So your run of the mill (or how you will start most of your SVG documents) SVG document might look a little like this:
<?xml version="1.0" standalone="no"?>
<svg width="500" height="400" version="1.1" xmlns="http://www.w3.org/2000/svg">

</svg>
An SVG document has a width and a height, something you might not be accustomed to in HTML. Apart from that most things shouldn’t be that different. All the SVG code you’re going to write is going to go inside the <svg> tags.
Tools of the trade
Before we begin it’s important to note that although SVG does involve sometimes coding things by hand, there are programs that make it a lot easier. One of the most popular is called Inkscape, which allows you to create objects and export them as SVG files. If you want to continue with SVG I sincerely suggest downloading Inkscape (it’s free!) and using it in conjunction with hard coding SVG.
On top of that, Adobe Illustrator also has SVG functionality and you can save your files as SVG files. If you have Illustrator this would probably be the best choice, however Inkscape provides a free alternative.
Basic Structure of SVG
SVG is all about semantics (that’s the order and grouping of information, in case you didn’t know). For that reason it’s pretty customary to start every SVG file with a title and description. Before we do that though, you should know about the main grouping tag in SVG, <g>. The <g> groups together similar elements or objects that are related in SVG. It’s kind of like <div>, although with a bit more of an SVG slant.
The title and description tags are <title> and <desc> respectively. Since they are related, we will group them together with a <g> tag. Therefore, in effect, every SVG document you write should look a bit like this:
<?xml version="1.0" standalone="no"?>
<svg width="500" height="400" version="1.1" xmlns="http://www.w3.org/2000/svg" viewBox="0 0 100 100">
   <g>
      <title>The Title for your SVG File</title>
      <desc>The description goes here! E.g. 'a red and black cube'</desc>
   </g>
</svg>
Understanding viewBoxes
You might understand the quite strange property viewBox above on the svg tag. To understand exactly what that is let me give you an example. Without the viewbox property, the SVG tag will still work. Suppose you try to define a coordinate (the main way we define shapes in SVG) on the SVG document. So lets say we want a circle at (50, 50). Without the viewBox that point will be 50 pixels in and 50 pixels down.
However, since we have a viewBox, we change the grid system completely. Our view box is 0 0 100 100. That means that the point at the very left hand edge and the very top of the SVG document is 0 and 0, and the point at the very bottom and very far right of the SVG document is 100 and 100. So (50, 50) with a viewBox of 0 0 100 100 is 50% across and 50% down, rather than 50 pixels. ViewBoxes can be anything, and have the following syntax:
viewBox="min-x min-y width height"
You could have a viewBox of 50 100 200 250. That means a coordinate of (50, 100) is in the very top left corner of the SVG document, and the very bottom right corner is (200, 250)!
Embedding SVG in HTML and CSS
SVG is easily embeddable into HTML documents, and therefore easily incorporated into your web designs. First off, SVG elements can be used as backgrounds in CSS:
background: url('file.svg');
On top of that, SVG can be embedded directly into an HTML document with the embed property. This is supported in HTML5 and all major browsers, so is safe enough to use:
<embed src="file.svg" type="image/svg+xml" />
It’s also possible to directly put SVG in an HTML document with the SVG tag like so:
<body>

<svg xmlns="http://www.w3.org/2000/svg" version="1.1">
  <!-- SVG CODE GOES HERE -->
</svg>

</body>
Basic Shapes
Drawing shapes in SVG uses co-ordinates inside the SVG document to define things like radius, amongst others. Along with these basic shapes we’ll be looking at a few basic properties that allow us to style the various shapes. These are pretty self explanatory and applicable to all the other shapes.
Rectangles
<rect x="20" y="20" width="100" height="200" fill="#f2ebdf" stroke="#e3d8c6" stroke-width="1" />
The above draws a rectangle whose top left point is at (20, 20) (that’s 20 pixels in from the left, and 20 pixels down from the top). It has a width of 100 and a height of 100. It is #f2ebdf in colour (the fill property defines the colour), and has a #e3d8c6 stroke around the edge that is 10 pixels in width.
Circle
Since circles are defined by their radius, we need to define radius property.
<circle cx="100" cy="100" r="100" fill="#f2ebdf" stroke="#e3d8c6" stroke-width="1" />
Another easy to miss detail when defining a circle is we define the position of the center of the circle, so rather than just using x we use cx.
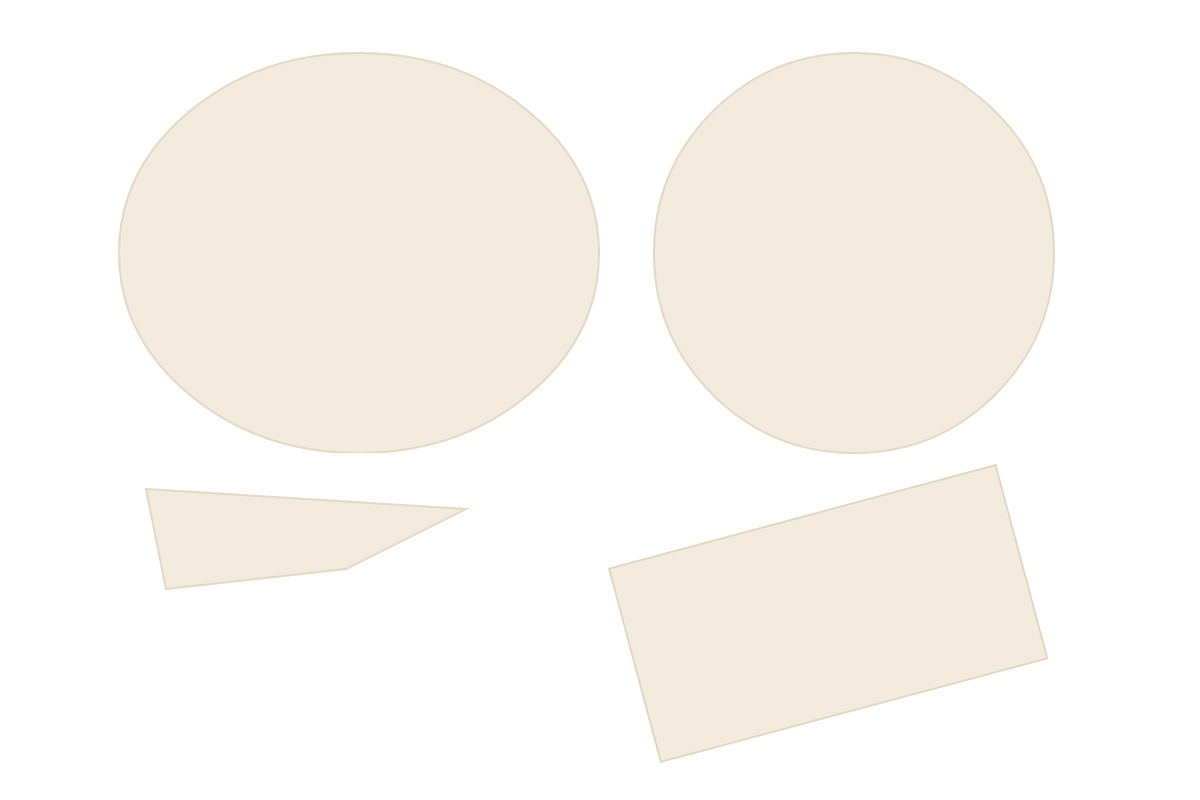
Ellipses
Quite similar to circles, only we define the radius for the x and y directions. For this, we use the rx and ry properties.
<ellipse cx="200" cy="300" rx="120" ry="100" fill="#f2ebdf" stroke="#e3d8c6" stroke-width="1" />
Polygons
Polygons are shapes with multiple points. To mark every point, we us a property called points, separating each point by a space. The final point will then be joined up to the first point creating a custom shape. For this reason, there is no need to define a width or height.
<polygon fill="#f2ebdf" stroke="#e3d8c6" stroke-width="1" points="30,60 120,50 180,20 20,10" />
So the above polygon will go from (30, 60) to (120, 50) to (180, 20), etc, before returning back to (30, 30).
Lines
Lines aren’t shapes, but they follow a similar procedure and syntax to what we would expect from a shape element. There are two ways to draw lines, the first being a single line from one point to another and the second being a polyline which encompasses many points and can turn.
<line x1="100" y1="20" x2="200" y2="40" stroke="black" stroke-width="25" />
The above single line will go from (100, 20) to (200, 40). A polyline is pretty straight forward too. A syntax similar to the polygon is used:
<polyline fill="none" stroke="black" stroke-width="25" points="10,20 40,55 100,120 50,20 " />
Again, similar to polygons, each set of points in the points property defines a point which the line will go through.
Paths
Paths are a little more complicated than what we’ve been used to so far. Paths use letters to define their shape. This gives us a lot more flexibility when drawing shapes.
<path d="M 350,75 L 379,161 L 469,161 L 397,215 L 423,301 L 350,250 L 277,301 L 303,215 L 231,161 L 321,161 z" fill="#f2ebdf" stroke="#e3d8c6" stroke-width="1" />
So what exactly does this mean? The d property is similar to the points property for polygons and polylines. When we say M in a path we want to move to that point without drawing a line. So M 350,75 means move to point (350, 75) without drawing a line. L means draw a line, so L 379,161 means move to (379, 161). The z at the very end means ‘the end’, and terminates the shape. Note that it is still possible to continue after z which starts a new path, so we could do this:
<path d="M 350,75 L 379,161 L 469,161 L 397,215 L 423,301 L 350,250 L 277,301 L 303,215 L 231,161 L 321,161 z M 100,100 L 200,200" fill="#f2ebdf" stroke="#e3d8c6" stroke-width="1" />
Below is a list of all the letters and everything they do. Try learning them!
| Letter | Syntax | Purpose |
| M or m | M x,y (Ex: M 20,400) | Moves to a point on the SVG document without drawing a line |
| L or l | L x,y (Ex: L 40,20) | Draws a line from the previously defined point to the point defined after L |
| H or h | H x (Ex: H 30) | Draws a horizontal line from the previously defined point to the x coordinate defined after the H |
| V or v | V y (Ex: H 30) | Draws a vertical line from the previously defined point to the y coordinate defined after the V |
| C or c | C x1,y1 x2,y2 x,y (Ex: C 50,40 100,40 100,100) | Draws a cubic Bézier curve from the previously defined point to (x,y) using (x1,y1) and (x2,y2) as control points (See below for definition of control points) |
| S or s | S x2,y2 x,y (Ex: S 50,40 100,100) | Draws a cubic Bézier curve from the previously defined point to (x,y) using (x2,y2) as a control point and assuming that (x1,y1) is a mirror of (x2,y2) on the previous command. If there was no previous command (x2,y2) is assumed to be the same as (x,y) (See below for definition of control points) |
| Q or q | Q x1,y1 x,y (Ex: S 100,40 30,10) | Draws a quadratic Bézier curve from the previously defined point to (x,y) using (x1,y1) as a control point (See below for definition of control points) |
| T or t | T x,y (Ex: T 100,40) | Draws a quadratic Bézier curve from the previously defined point to (x,y) assuming the control point is the mirror of the control point in the previous command. If you didn’t have a control point in the previous command the control point is assumed to be the same as (x,y) (See below for definition of control points) |
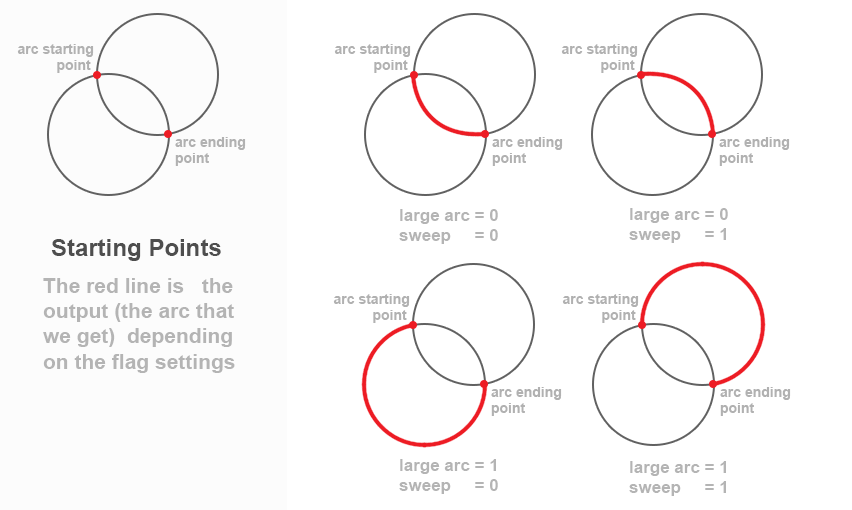
| A or a | A rx,ry x-axis-rotation large-arc?,sweep? x,y (Ex: A 100,40 30 0,0 20,20) | Draws an arc from the previously defined point to (x,y) based on the radii (rx,ry) and the rotation of the curve (x-axis-rotation). Two boolean functions can be set to further define the curve (large-arc,sweep) which are either set to 1 or 0. (See below for more information on large-arc and sweep) |
Hey! What’s the difference between uppercase and lowercase?
You may have noticed that both uppercase and lowercase letters can be used. You’d be right in thinking there is a difference. When you use an uppercase letter the point is defined from the top left of document. So the point (100, 100) is 100 pixels across and 100 pixels down from the top left of the document.
If you use a lowercase letter, however, the point is defined relative to the last point. So suppose you have M 100,100 l 20,20. You move to point (100,100) and then draw a line to (120, 120). Effectively, the last point becomes your zero point.
Control Points?
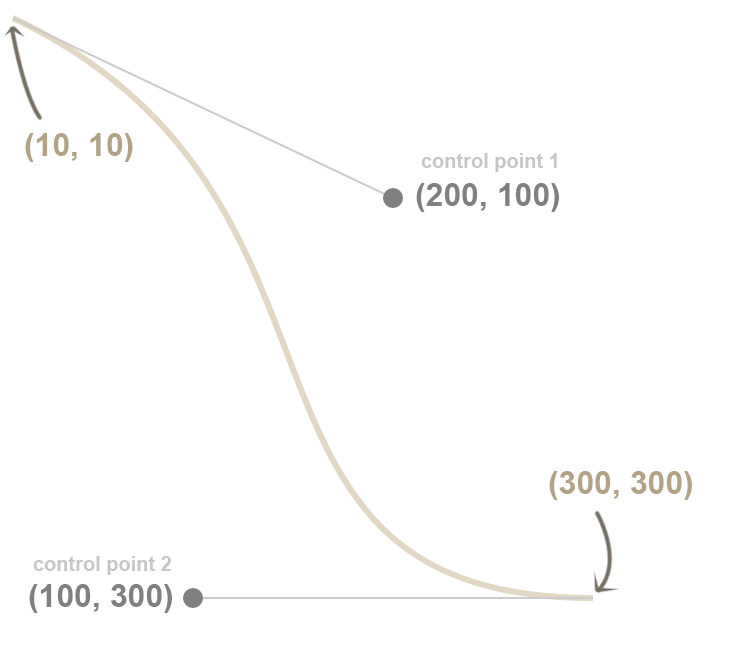
That might sound confusing, but it’s just like when you use photoshop and the pen tool. Cubic and Quadratic Bézier curves are mathematical functions, and the control points help define that function. Consider the following path:
<path d="M 10,10 C 200,100 100,300 300,300 M 10,10 z" fill="white" stroke="#e3d8c6" stroke-width="3" />
The control points are at (200, 100) and (100, 300). The curve is drawn from (10, 10) to (300, 300). Below is an annotated diagram of that curve.
Quadratic Bézier curves differ only in the fact that they have a single control point, large arc and sweep. You can set these to either 1 or 0, and they give us quite odd results.
Arcs
Arcs are a little more tricky in that they have these odd boolean settings large arc and sweep. Below is a diagram showing exactly how they work. They can be set to either 1 or 0.
More Advanced Structure
Now that we understand the basic concepts behind drawing on a SVG document, lets look in a little bit more detail at the structure of an SVG document. There are many structural elements in SVG which can be used to help you when creating something.
Definitions and Use
We can define elements in SVG that we use a lot for easy use. This could be useful if you’re using the same gradient a lot, but we’ll get to that in part 2 of this series. For now we’ll look at how we can combine definitions with another element called use.
First off, defining something is pretty easy. If you want to define a reusable element, that element must go inside a tag called <defs>. You can have multiple definitions inside a single defs tag, but each must have a unique ID. For example, below I define 2 rectangles:
<defs>
   <rect id="definition1" width="120" height="50" fill="red" />
   <rect id="definition2" width="500" height="20" fill="blue" />
</defs>
But what exactly is the use of defining stuff? Well, definitions do not show up directly in your SVG document, but we can call upon these definitions and use them anywhere using the use tag. There are other ways to use definitions with different calling methods but we’ll get to that in the follow up parts to this guide.
So we can use a definition with the <use> tag:
<use x="30" y="30" xlink:href="#definition1" />
This will call upon our definition which has the id definition1. The xlink:href property is just a way to link up with the definition of our choice. The xlink attribute is not actually a part of SVG and wont work, so to use this we need to change our SVG tag to tell the browser that we want to be able to use it. To do that, just change your SVG tag from something like this:
<svg width="500" height="400" version="1.1" xmlns="http://www.w3.org/2000/svg" xmlns:xlink="http://www.w3.org/1999/xlink">
to this:
<svg width="500" height="400" version="1.1" xmlns="http://www.w3.org/2000/svg">
Since SVG is totally scalable we can define the use element with different widths and heights and the object in our definition will change size depending on that. For example we could easily define our rectangle has half the width and height in the use tag, and it would display that way.
<use x="30" y="30" width="60" height="25" xlink:href="#definition1" />
So the use tag above will be replaced by the rectangle that we called. This has more apparent uses when creating complex shapes that are used a lot, which can then be resized at will.
Symbols
Speaking of <use>, we can also call upon a <symbol> tag to be called upon later in an SVG document. A symbol can be called within or outside the <defs> tag, and will not appear in the document until you call it with a use tag.
The main difference between a symbol and definitions is that a symbol is a single object, and a symbol can have a custom viewBox. So you can redefine a viewBox specifically for a symbol. Otherwise, it’s much the same as a definition:
<symbol id="symbol1">
   <rect width="120" height="50" fill="red" />
   <rect width="500" height="20" fill="blue" />
</defs>
Which can then be called to be put into a document using the use tag:
<use x="30" y="30" xlink:href="#symbol1" />
Summary
In this tutorial we have covered some of the core tenets of SVG, from basic structure to drawing shapes amongst other things. In part 2 we will look at styling in more depth as well as some other awesome things SVG can do. Don’t forget to subscribe or follow to make sure you don’t miss it!